
The Proper Way to Replace A Dryer Heating Element In San Diego.
Replacing a dryer heating element in San Diego can seem like a daunting task, but with the right tools and a bit of knowledge, it’s a repair that most homeowners can handle on their own. In this article, we’ll walk you through the steps of how to replace a dryer heating element is a common dryer repair and get your dryer running smoothly again. 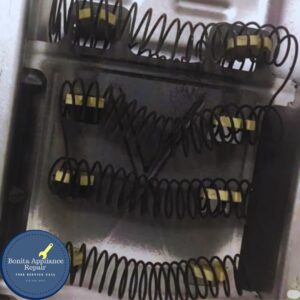
Tools and materials needed for the replacement
Before you get started, it’s important to gather the necessary tools and supplies. You’ll need a screwdriver (preferably a Phillips head), a pair of pliers, a socket wrench, and a new heating element. You may also want to have a vacuum on hand to clean out any lint or debris that has accumulated inside the dryer.
Step-by-step instructions for replacing a dryer heating element
Step 1: Unplug the dryer and shut off the gas supply (if applicable). Safety is always the top priority when working with appliances, so it’s important to make sure the dryer is completely disconnected from any power or gas sources before you begin.
Step 2: Remove the dryer’s back panel. This will likely require the use of a screwdriver to remove a few screws that hold the panel in place. Once you’ve removed the screws, the panel should come off relatively easily.
Step 3: Locate the heating element. The heating element is typically located near the back of the dryer and is usually easy to spot due to its coiled shape. It will be connected to the dryer’s control panel with a pair of wires.
Troubleshooting tips for common issues
Step 4: Disconnect the wires from the heating element. Use the pliers to gently pull the wires off the heating element, being careful not to damage the wires or the element itself.
Step 5: Remove the heating element from the dryer. The heating element is typically held in place with a few screws or bolts. Use the socket wrench to loosen and remove these fasteners, and then gently lift the heating element out of the dryer.
Step 6: Clean out any lint or debris that has accumulated inside the dryer. Use the vacuum to suck up any lint or debris that has accumulated inside the dryer. This will help prevent any potential fire hazards and ensure that the dryer is running as efficiently as possible.
Step 7: Install the new heating element. Take the new heating element and carefully place it into the dryer, making sure that it is properly aligned and seated in place. Use the socket wrench to secure the element in place with the screws or bolts that you removed earlier.
Step 8: Reconnect the wires to the new heating element. Use the pliers to gently attach the wires to the new heating element, making sure that they are properly connected.
Step 9: Replace the dryer’s back panel. Once the new heating element is installed and the wires are properly connected, it’s time to replace the back panel. Simply align the panel with the dryer and use the screwdriver to reattach it in place.
Step 10: Test the dryer. With the back panel securely in place and the dryer plugged back in, turn the dryer on and run a test load of laundry to make sure that the new heating element is working properly. If the dryer is heating up and functioning properly, the repair is complete!
How a new heating element can improve your dryer’s performance
Replacing a dryer heating element can seem intimidating, but with the right tools and a bit of know-how, it’s a repair that most homeowners can handle on their own. By following the steps outlined in this article, you should be able to successfully replace your dryer’s heating element and get your appliance running smoothly once again. So, this is how you can replace a dryer heating element.
If you need any help for appliance repair in San Diego. Call Bonita Appliance Repair at 619-329-5938.
Frequently Asked Questions
Q: How much does it cost to repair a heating element in a dryer?
The cost of repairing a heating element in a dryer can vary depending on various factors such as the brand of the dryer, the specific model, and your location. Generally, the cost can range from $100 to $300, including both parts and labor. It is recommended to contact a local appliance repair service or technician for a more accurate estimate.
Q: How do you fix a heating element in a dryer?
Fixing a heating element in a dryer typically involves the following steps:
Unplug the dryer from the power source.
Locate the heating element, which is usually found behind the dryer drum.
Remove any panels or covers necessary to access the heating element.
Test the heating element using a multimeter to determine if it’s functioning properly.
If the heating element is faulty, disconnect the wires attached to it and remove it from the dryer.
Install a new heating element by connecting the wires and securing it in place.
Reassemble any panels or covers that were removed.
Plug in the dryer and test it to ensure the heating element is working correctly.
Q: Is it cheaper to repair or replace a dryer?
Whether it is cheaper to repair or replace a dryer depends on several factors, including the extent of the issue, the age of the dryer, and the cost of repairs. As a general guideline, if the repair cost is more than 50% of the price of a new dryer and the appliance is old, it may be more cost-effective to replace the dryer. However, it is advisable to consult with a professional technician who can assess the specific situation and provide a recommendation based on their expertise.
Q: Do dryer heating elements wear out?
Yes, dryer heating elements can wear out over time due to extended usage and normal wear and tear. The heating element in a dryer is subjected to high temperatures, which can cause it to deteriorate and eventually fail. Factors such as the frequency of use, maintenance practices, and the quality of the heating element itself can affect its lifespan.
Q: What is the life expectancy of a dryer heating element?
The life expectancy of a dryer heating element can vary depending on several factors, including the quality of the element, usage patterns, and maintenance. On average, a dryer heating element can last between 8 to 18 years. However, it’s important to note that individual experiences may vary, and premature failures or extended lifespans can occur.
Q: How do I know if I have a bad heating element in my dryer?
There are several signs that can indicate a bad heating element in a dryer. These include:
The dryer runs but does not produce heat.
Clothes take an unusually long time to dry.
The dryer overheats or shuts off prematurely during operation.
There are visible signs of damage or breakage on the heating element.
If you observe any of these symptoms, it is likely that the heating element in your dryer is faulty and may need to be replaced.
Q: Should a dryer heating element glow red?
Yes, a functioning dryer heating element should glow red when it is in operation. The heating element is designed to generate heat by passing an electrical current through a resistive coil, which causes it to heat up. The red glow is an indication that the heating element is properly functioning and producing heat. However, if the heating element is not glowing red or is producing an inconsistent glow, it may be a sign of a malfunction or failure.
Q: Why is my dryer not drying clothes but getting hot?
If your dryer is not drying clothes but is getting hot, it could be due to a few possible reasons. Some potential causes include:
The dryer vent may be clogged or restricted, preventing proper airflow. Check and clean the vent to ensure it is clear.
The lint filter may be clogged. Clean the lint filter before each use to maintain proper airflow.
The heating element may be partially faulty, resulting in insufficient heat to dry the clothes effectively. In this case, it might be necessary to replace the heating element.
If the issue persists after checking these factors, it is advisable to consult a professional technician for further diagnosis and repair.
Q: Why is my dryer taking multiple cycles to dry?
If your dryer is taking multiple cycles to dry clothes, it could be a sign of an underlying issue. Potential causes include:
A clogged or restricted dryer vent, which hampers proper airflow. Check and clean the vent to improve drying efficiency.
The lint filter may be clogged, reducing airflow. Clean the lint filter before each use.
The heating element may be faulty and not generating enough heat. This can result in prolonged drying times. Consider testing or replacing the heating element.
There may be a problem with the dryer’s moisture sensor or thermostat, causing the dryer to prematurely signal that the clothes are dry. These components may need to be inspected and potentially replaced.
If you have checked these factors and the issue persists, it is recommended to seek assistance from a professional technician to diagnose and fix the problem.

Discovering San Diego's Historic Treasures
Are you ready to embark on a journey through time and explore San Diego’s historic treasures? Join us as we take you on a captivating

Outdoor Adventures in San Diego County
Are you ready to dive into a world of outdoor adventures? Look no further than San Diego County. This breathtaking paradise is like a treasure

Top Restaurants in San Diego
Are you craving a culinary adventure in San Diego? Look no further, because this vibrant city is brimming with top-notch restaurants that will satisfy your

The Complete Guide to Hotpoint Appliance Maintenance in San Diego
Are your appliances leaving you in hot water? Don’t let them burn a hole in your pocket. Introducing The Complete Guide to Hotpoint Appliance Maintenance
Why Choose Professional Hotpoint Appliance Repair Services in San Diego?
Why Choose Professional Hotpoint Appliance Repair Services in San Diego? When it comes to Hotpoint appliance repair services in San Diego, choosing a professional service
Hotpoint Appliances: Common Issues and When to Call a Repair Service in San Diego
Hotpoint Appliances: Common Issues and When to Call a Repair Service in San Diego Are your Hotpoint appliances having Common Issues and ready to Call