“DIY Dryer Motor Repair San Diego: A Step-by-Step Guide”
Introduction:
If you’ve noticed that your dryer isn’t running as smoothly as it used to, or if it’s not starting up at all, it may be time to consider repairing the motor. A faulty dryer motor can be a frustrating problem, but with a little bit of knowledge and the right tools, you can fix it yourself. In this blog post, we’ll walk you through the steps of repairing a dryer motor, from diagnosing the issue to reassembling the dryer.

“Diagnosing the Dryer Motor Problem”
Before you start disassembling your dryer, it’s important to identify the root cause of the problem. Here are some common signs that your dryer’s motor may be at fault:
- The dryer won’t start or turn on
- The dryer is making a loud or unusual noise
- The dryer is taking longer than usual to dry clothes
If you’re experiencing any of these issues, there’s a good chance that the motor is the culprit. However, it’s always a good idea to rule out other potential problems first. Check the dryer’s fuse or circuit breaker, and make sure that the dryer is properly plugged in. If these things are in order, it’s time to start checking the motor.
“Gathering Your Tools and Materials”
Before you begin the repair process, it’s important to gather all of the tools and materials you’ll need. Here’s a list of items you may need:
- A screwdriver (preferably a Phillips head)
- A socket wrench and sockets
- Pliers
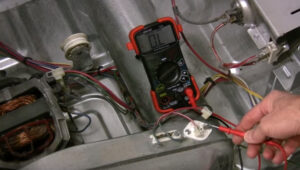
- A multimeter
- A replacement dryer motor (if necessary)
“Disassembling the Dryer”
Once you have all of your tools and materials ready, it’s time to start disassembling the dryer. Here are the general steps you’ll need to follow:
- Unplug the dryer From Power Source and move it away from the wall. (This Is An Important Safety Precaution As You Will Be Working With Electrical Components.)
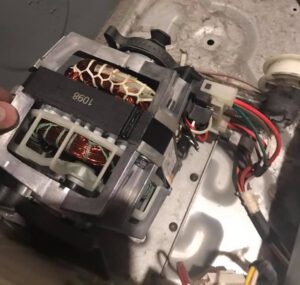
- Remove the back panel of the dryer to access the motor. In Most Dryers, The Motor Is Located In The Back Of The Appliance.
Check For Visible Signs Of Damage. Look For Any Signs Of Physical Damage Such As Bent Fan Blades Or A Broken Housing.
Use the screwdriver to remove any screws or bolts that are holding the motor in place.
- Carefully lift the motor out of the dryer.
“Testing the Motor”
 Now that you have the motor out of the dryer, it’s time to test it to see if it’s the cause of the problem. Here’s how to test a dryer motor:
- Connect the multimeter to the motor’s terminal wires.
- Set the multimeter to the “ohms” setting.
- Test the resistance of the motor by touching the multimeter’s probes to the terminal wires.
- If the multimeter reads infinite resistance, the motor is likely faulty and needs to be replaced.
Test The Motor’s Windings. If The Continuity Test Did Not Yield A Clear Result, You Can Test The Motor’s Windings To See If They Are Functioning Properly. To Do This, You Will Need To Remove The Motor From The Dryer And Use The Multimeter To Test The Resistance Of Each Winding.
Test The Start And Run Capacitors (If Applicable). Some Dryer Motors May Have Start And Run Capacitors, Which Help The Motor Start And Run Smoothly. To Test These Components, You Will Need To Remove Them From The Motor And Use The Multimeter To Test Their Capacitance. If The Capacitors Are Faulty, They Will Need To Be Replaced.
- Make sure to determine if your dryer is worth repairing or replacing.
- It’s worth noting that testing a dryer’s motor can be a complex process, and it’s recommended to consult a qualified appliance repair technician if you are unsure of how to proceed.
“Installing a Replacement Motor”
Installing A New Dryer Motor Can Seem Like A Daunting Task, But With The Right Tools And A Bit Of Know-How, It Can Be Done Relatively Easily. If you’ve determined that the motor needs to be replaced, it’s time to install the new one. Here’s how to do it:
- Follow the same steps you used to remove the old motor to remove any mounting brackets or other components that are attached to the new motor.
- Carefully slide the new motor into the dryer, making sure that it is properly aligned with the mounting brackets.
- Secure the motor in place using the screws or bolts that you removed earlier.
- Reassemble the dryer, starting with the back panel and
Dryer Repair Near San Diego

If you’re in need of dryer repair in the San Diego area, look no further than Bonita Appliance Repair. Our team of experienced technicians is equipped to handle any issues you may be experiencing with your dryer, from heating element problems to lint build-up and beyond. We pride ourselves on our fast and reliable service, and we strive to get your dryer up and running smoothly as quickly as possible. Whether you’re dealing with a noisy machine or a dryer that just won’t start, we have the expertise and the tools to get the job done right. So don’t hesitate – if you need dryer repair in San Diego, give Bonita Appliance Repair a call today.
In conclusion, dryer motor repair is a task that can be accomplished with a little bit of knowledge and the right tools. While it may seem intimidating at first, by following the steps outlined in this blog post and consulting a qualified appliance repair technician if necessary, you can successfully diagnose and repair any issues with your dryer’s motor. Remember to always unplug the dryer and exercise caution when working with electrical components, and you’ll be well on your way to getting your dryer running smoothly again. With a little bit of elbow grease and some basic repair skills, you can save yourself the cost and hassle of calling in a professional and get your dryer up and running in no time.
